Introduction
Today, I'll be demonstrating the Fee Payments module, which is where schools record payments received from students or parents.
This module updates student balances automatically and generates official payment receipts. Though this has been highlighted previously, here is a simple way to make payment without any student discount. We also make repetition for emphasis's sake, since this module is very important to school administrators.
Navigating to Fee Payments
To access this module, go to Finance, and then select Fee Payments.
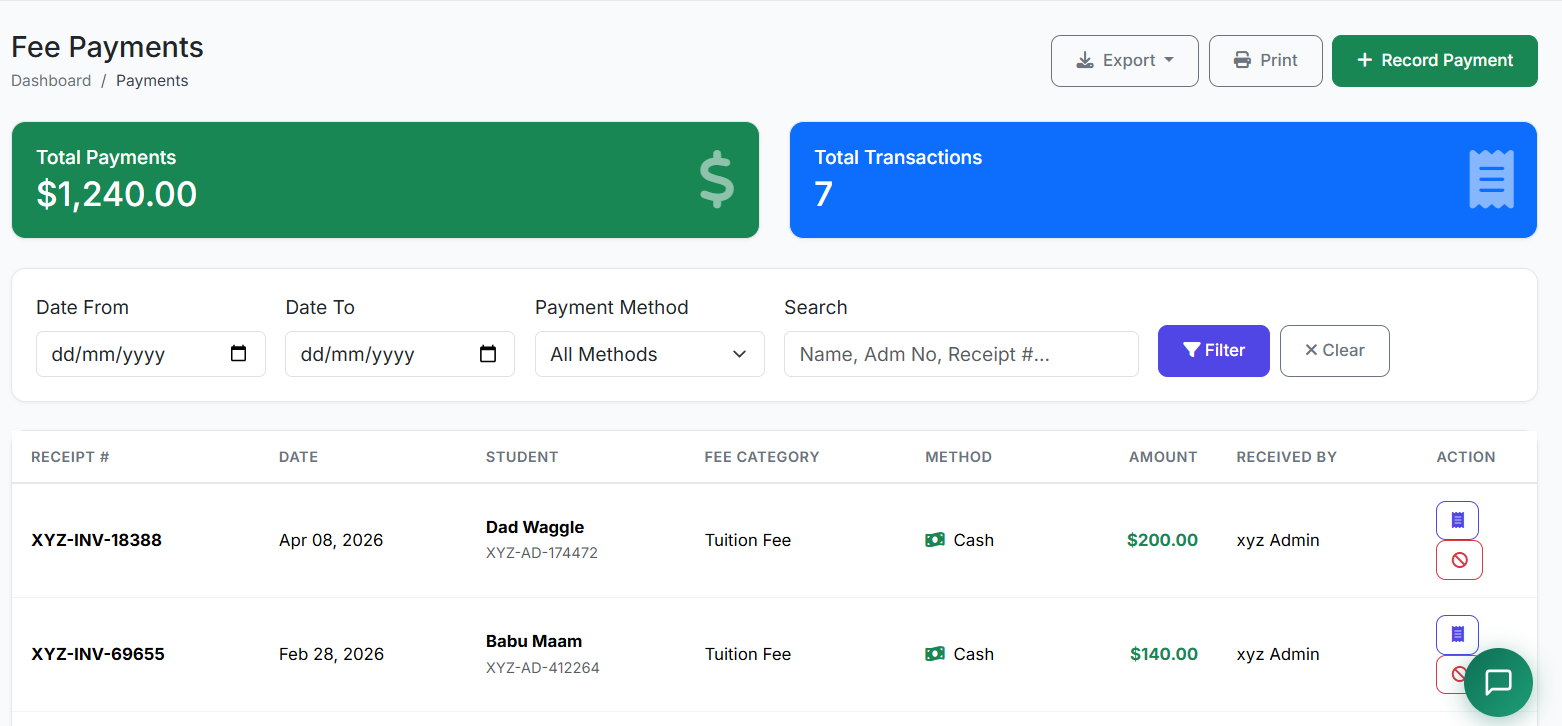
This page displays all recorded payment transactions.
Understanding the Fee Payments Page
The Fee Payments page shows a list of all payment records. Each row displays:
Receipt number
Payment date
Student name
Amount paid
Payment method
Staff member who received the payment
Available actions (e.g., viewing or printing receipts)
This serves as a complete payment history for the school.
Important Note:
Student Fee (discussed earlier) and Fee Payment are not separate modules. They work together to achieve the same goal – payment. They are connected, and you can easily link from one page to another.
Recording a New Payment
To record a new payment, click on Collect Fee or New Payment.
Step-by-Step Process
Search for and select the student
The system immediately displays all outstanding fees for that student.
Select which fees the payment applies to
Enter the payment amount
Set the payment date
Choose the payment method (cash, cheque, bank transfer, or card)
Enter a reference number (if applicable)
e.g., cheque number or transaction ID
Add any optional remarks
Click Record Payment to save
Payment Methods Supported
The system supports multiple payment methods, including:
Cash
Cheque
Bank transfer
Credit or debit cards
Online payments
Mobile money
This flexibility allows schools to accommodate different parent payment preferences.
Important Note:
We do not allow credit card or online payment through the portal, since each school has different ways of collecting fees from their students. This is to avoid unnecessary confusion and complication in the system.If any school has an online payment link (such as Stripe, PayPal, etc.), they can forward the link to parents via the Announcement Centre.
Making Payment After Fee Assignment
There are two ways to make payment after fee assignment:
Method 1 – Direct Payment
Click the payment icon next to the student's name for a direct payment method.
Method 2 – Via Fee Payment Page
Click "Fee Payment" to view the list of all payments that have been made.
Click "Record Payment" at the top right corner.
Select a student from the student list.
This automatically displays the list of fees the student is required to pay.
After selecting a fee, enter the amount and payment method.
Click "Record Payment".
Printing a Receipt
You may wish to print a receipt for the student by clicking the "View Receipt" icon on the Fee Payment List page. The print button allows you to generate a printed copy for the student.
Note: Emailing a receipt is not necessary, as the student's parent can view and print the payment receipt from the Parent Portal.
Cancelling an Incorrect Payment
Payments may be recorded incorrectly for various reasons.
To cancel a payment:
Click the "Cancel Payment" icon on the Fee Payment List page.
You will be prompted to enter an optional cancellation reason.
Click "OK" to confirm the cancellation.
This automatically revokes the payment and adjusts the student's balance.
Handling Partial Payments
The system also supports partial payments.
Parents can pay in installments by entering an amount less than the total due. The payment is applied immediately, and the remaining balance stays on record until fully paid.
Generating and Printing Receipts
Once a payment is recorded, the system automatically generates a receipt with a unique receipt number.
This receipt can be printed or shared electronically and includes:
Payment details
The remaining balance (if any)
Daily Collection Report
The module also provides a Daily Collection Report.
Administrators can view total collections by:
Date range
Payment method
Staff member
These reports can be printed or exported for reconciliation and accounting.
Note: More on Fee Reports will be discussed under the Report modules.
Best Practices
As best practice:
Always record payments immediately when they are received
Provide receipts for every transaction
Balance the cash drawer daily
Follow up on bounced cheques
Regularly reconcile payments with bank statements
Closing
That concludes our demonstration of the Fee Payments module.
This module ensures accurate payment tracking, transparency, and proper financial control.