Introduction
Today, we'll explore the Students module in SSMS.
This module is the heart of the system — where all student information is managed, from personal details and enrollment to academics, attendance, and fees.
Every student must be registered here before they can attend classes or take exams.
📍 Accessing the Students Module
To open the Students page:
Go to People in the sidebar
Select Students
📋 Students List Page
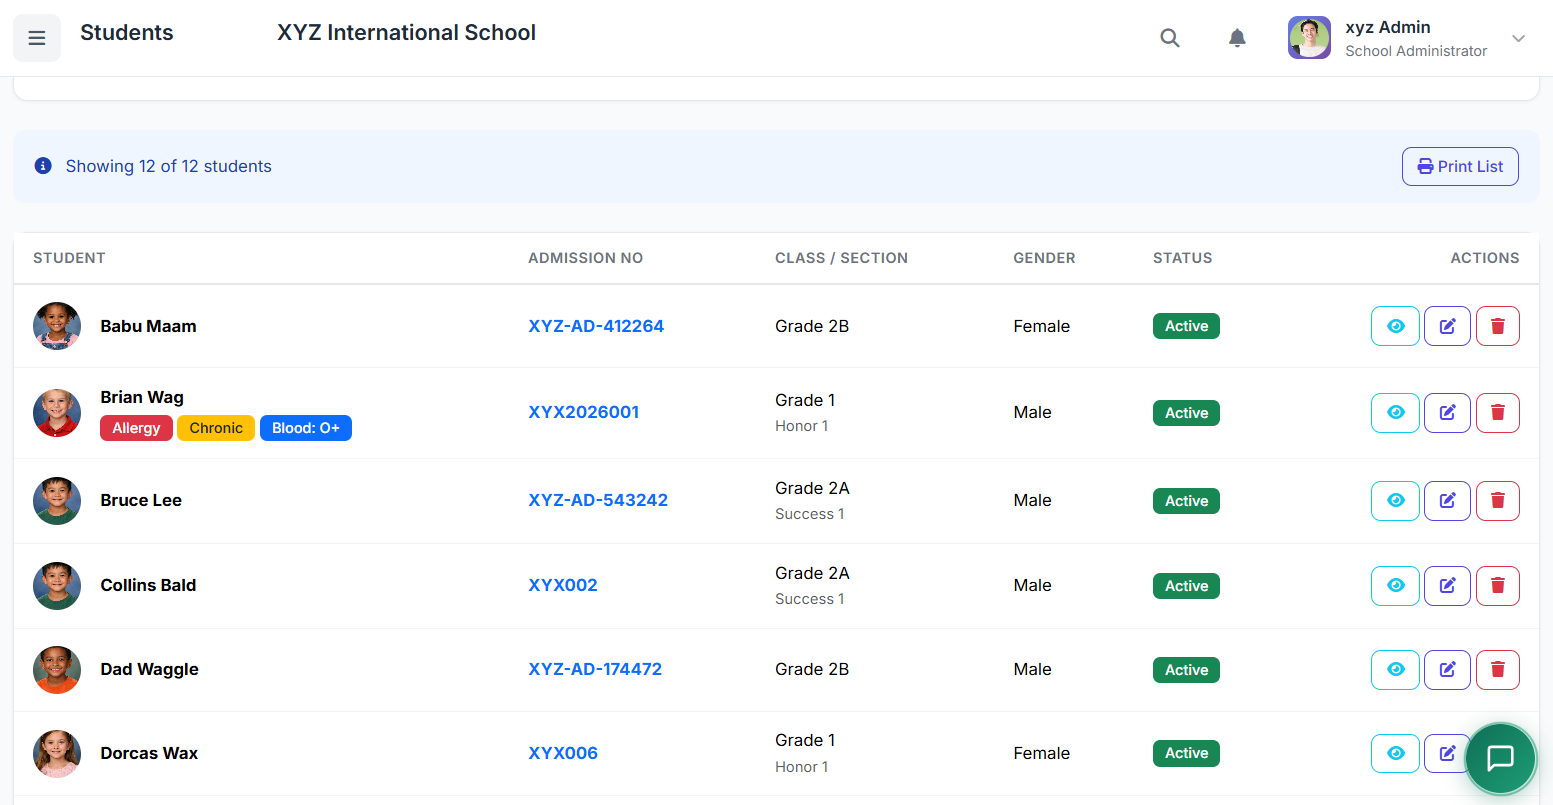
The page shows all students with key information:
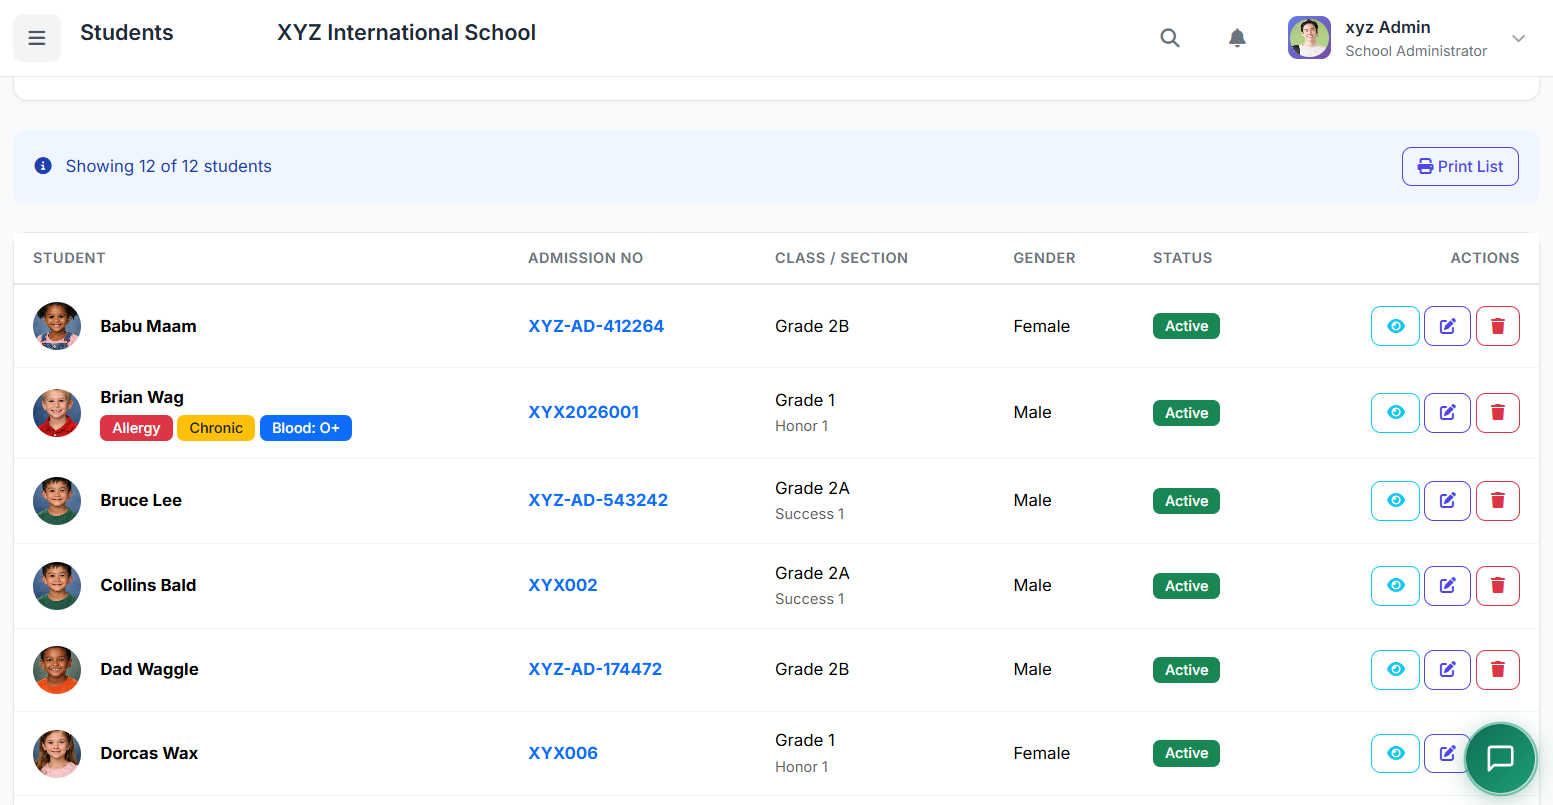
| Column | Description |
|---|---|
| Photo | Student profile picture |
| Admission Number | Unique student identifier |
| Name | Full name |
| Class/Section | Current assignment |
| Gender | Demographic info |
| Status | Active, Graduated, etc. |
| Actions | View, Edit, Delete |
🚨 Medical Alerts
The student list page also reveals records of students with urgent medical attention.
Example: Brian Wag — Allergic + Chronic medical condition
This helps the school and parents act fast.
🔍 Filtering and Searching Students
You can quickly find students using:
| Filter | Description |
|---|---|
| Search Box | Name, admission number, phone |
| Class Filter | Show students in a specific class |
| Section Filter | Show students in a specific section |
| Status Filter | Active, Graduated, Transferred, Suspended |
| Centre Filter | For multi-centre schools |
➕ Adding a New Student
Click Add Student to open the registration form.
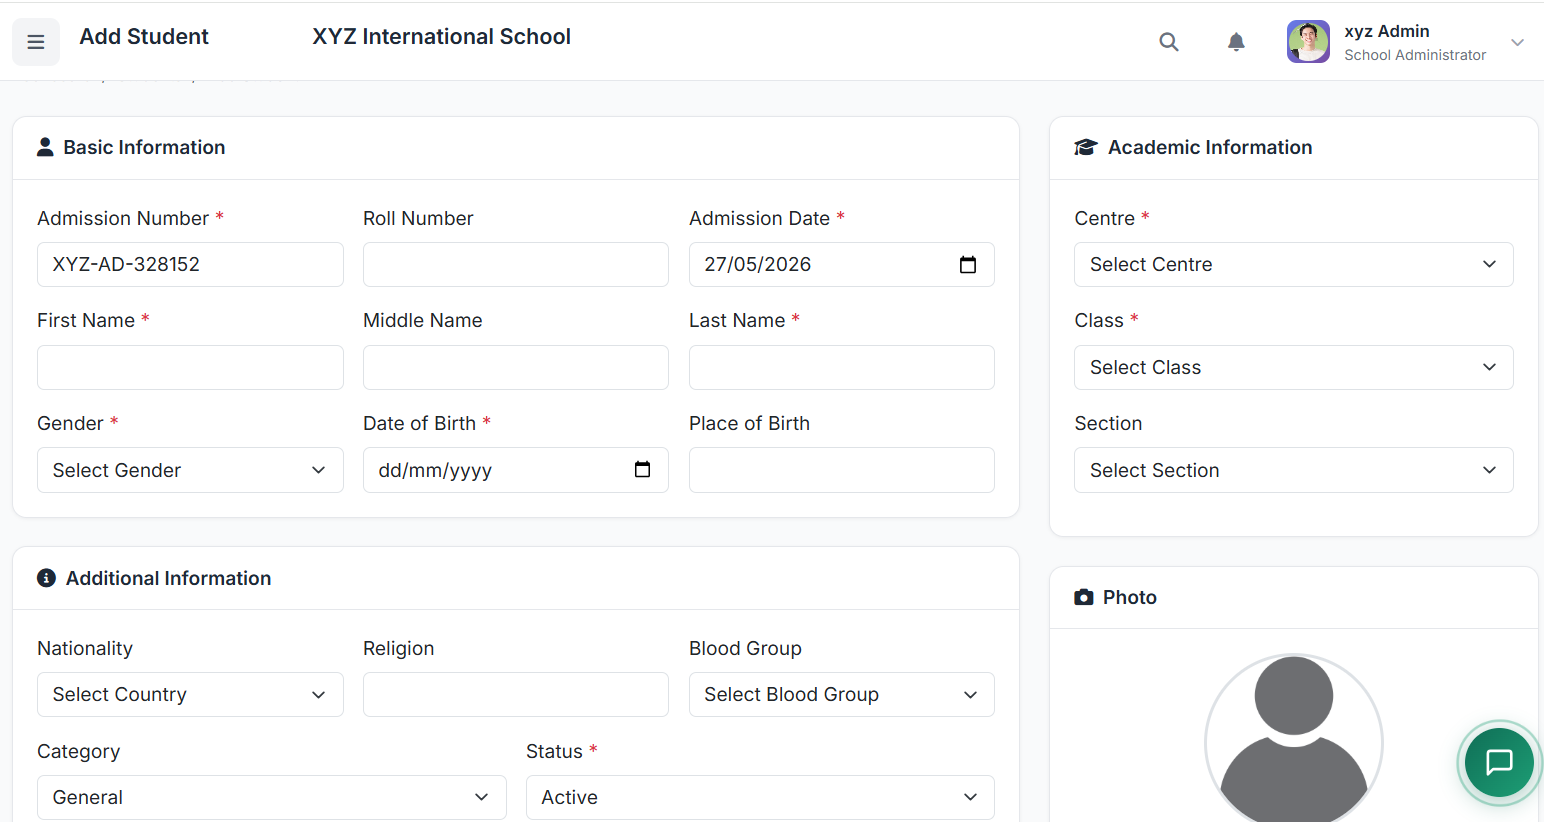
Section 1: Basic Information
Field Description Admission Number Unique student ID First Name, Middle Name, Last Name Full name Admission Date Enrollment date Gender, Date of Birth, Place of Birth Demographics
| Field | Description |
|---|---|
| Admission Number | Unique student ID |
| First Name, Middle Name, Last Name | Full name |
| Admission Date | Enrollment date |
| Gender, Date of Birth, Place of Birth | Demographics |
Section 2: Additional Information
Field Description Nationality Country of origin Religion Optional Blood Group For medical purposes Category & Status Student classification
| Field | Description |
|---|---|
| Nationality | Country of origin |
| Religion | Optional |
| Blood Group | For medical purposes |
| Category & Status | Student classification |
Section 3: Academic Information
Field Description Centre Assigned centre Class & Section Current placement
| Field | Description |
|---|---|
| Centre | Assigned centre |
| Class & Section | Current placement |
Section 4: Contact Information
Field Description Address, City, State, Postal Code Home address
Note: Phone numbers are stored in the Parent record, not the student record.
| Field | Description |
|---|---|
| Address, City, State, Postal Code | Home address |
Note: Phone numbers are stored in the Parent record, not the student record.
Section 5: Photo Upload
Click Choose File
Select image
Preview
Click Create Student to save
Click Choose File
Select image
Preview
Click Create Student to save
🔢 About Admission Numbers
The admission number (also called student number, ID, or enrollment number) is a very important part of the student record.
We allow each school to create the admission number since different schools have unique naming patterns.
Recommended format: Start with the first three letters of the school's name, followed by the year and sequence numbers.
| Example | Breakdown |
|---|---|
| ABC2025001 | ABC (school code) + 2025 (year) + 001 (sequence) |
Use whatever pattern you have chosen for your school.
👀 Viewing a Student Profile
Click View or the student's name to open their profile:
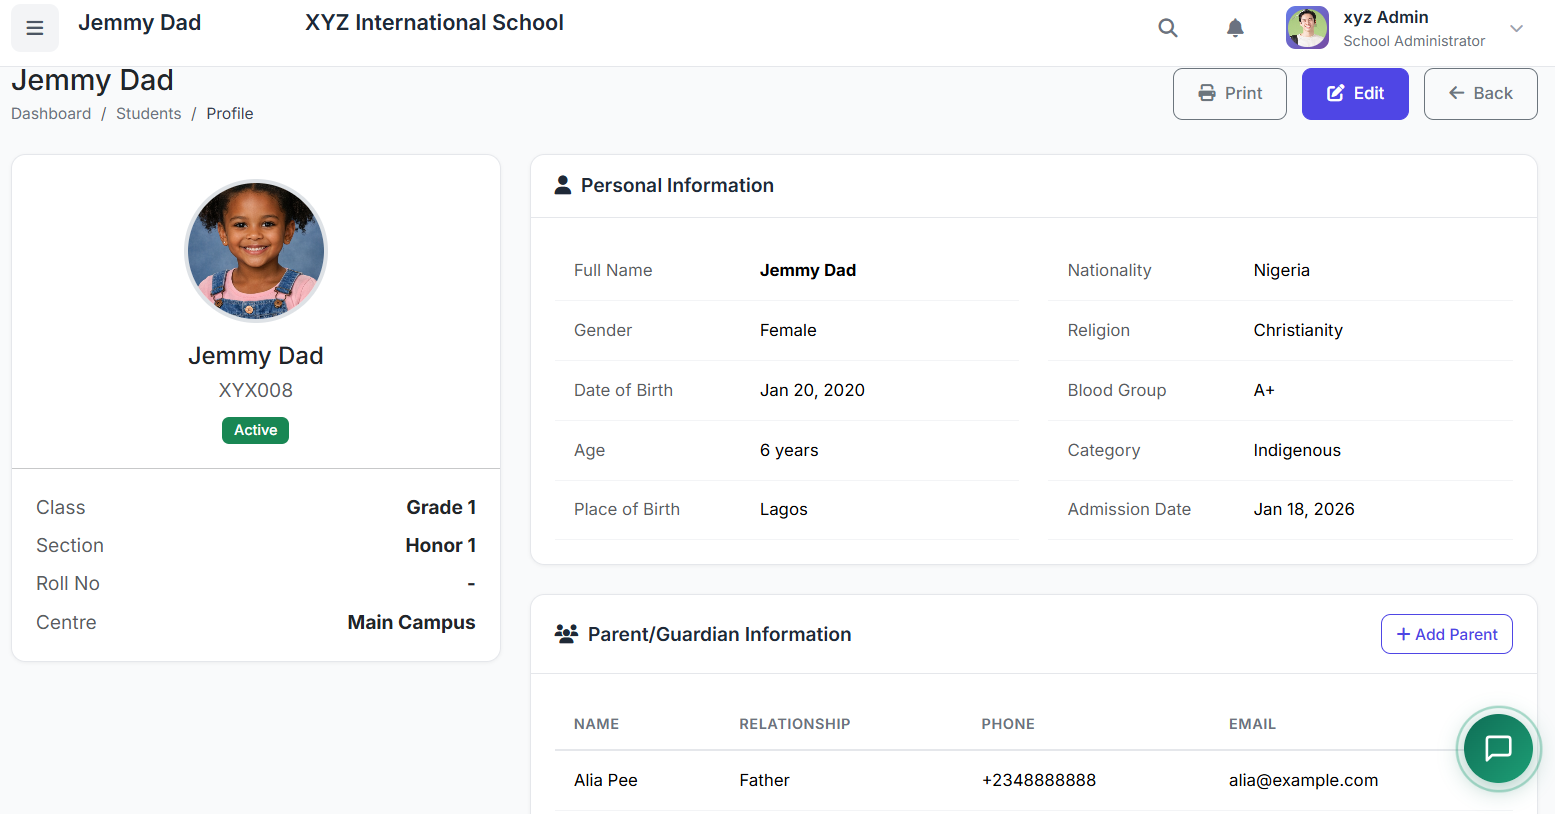
| Section | Information |
|---|---|
| Header | Photo, Name, Class, Status |
| Personal Details | DOB, Gender, Blood Group |
| Contact Information | Address, etc. |
| Enrollment Details | Admission info |
| Parent/Guardian Links | Linked parent profiles |
| Attendance Link | View attendance records |
| Fees Link | View fee history |
| Transfer Link | Transfer student |
👪 Parent/Guardian Link
You can link a student to their parent/guardian:
Use the Add Parent button
Either:
Link to an already registered parent
Create new parent information
Enter names, phones, emails
Select relationship (Father, Mother, Guardian)
✏️ Editing Student Information
Click Edit from the list or profile
Update necessary fields
Click Update Student
Click Edit from the list or profile
Update necessary fields
Click Update Student
🔄 Changing Student Class/Section
Method 1: Direct Edit
Edit student → Change Class/Section → Save
Edit student → Change Class/Section → Save
Method 2: Bulk Transfer
Go to the student information page
Click Transfer link
Select multiple students
Bulk Actions → Transfer
Select new class/section
Confirm
Go to the student information page
Click Transfer link
Select multiple students
Bulk Actions → Transfer
Select new class/section
Confirm
⚡ Student Status Management
Status Use Case Active Currently enrolled Graduated Completed final year Transferred Moved to another school Suspended Temporarily barred Expelled Permanently removed
Change status via Edit → Status dropdown → Save
| Status | Use Case |
|---|---|
| Active | Currently enrolled |
| Graduated | Completed final year |
| Transferred | Moved to another school |
| Suspended | Temporarily barred |
| Expelled | Permanently removed |
Change status via Edit → Status dropdown → Save
📤 Bulk Student Import
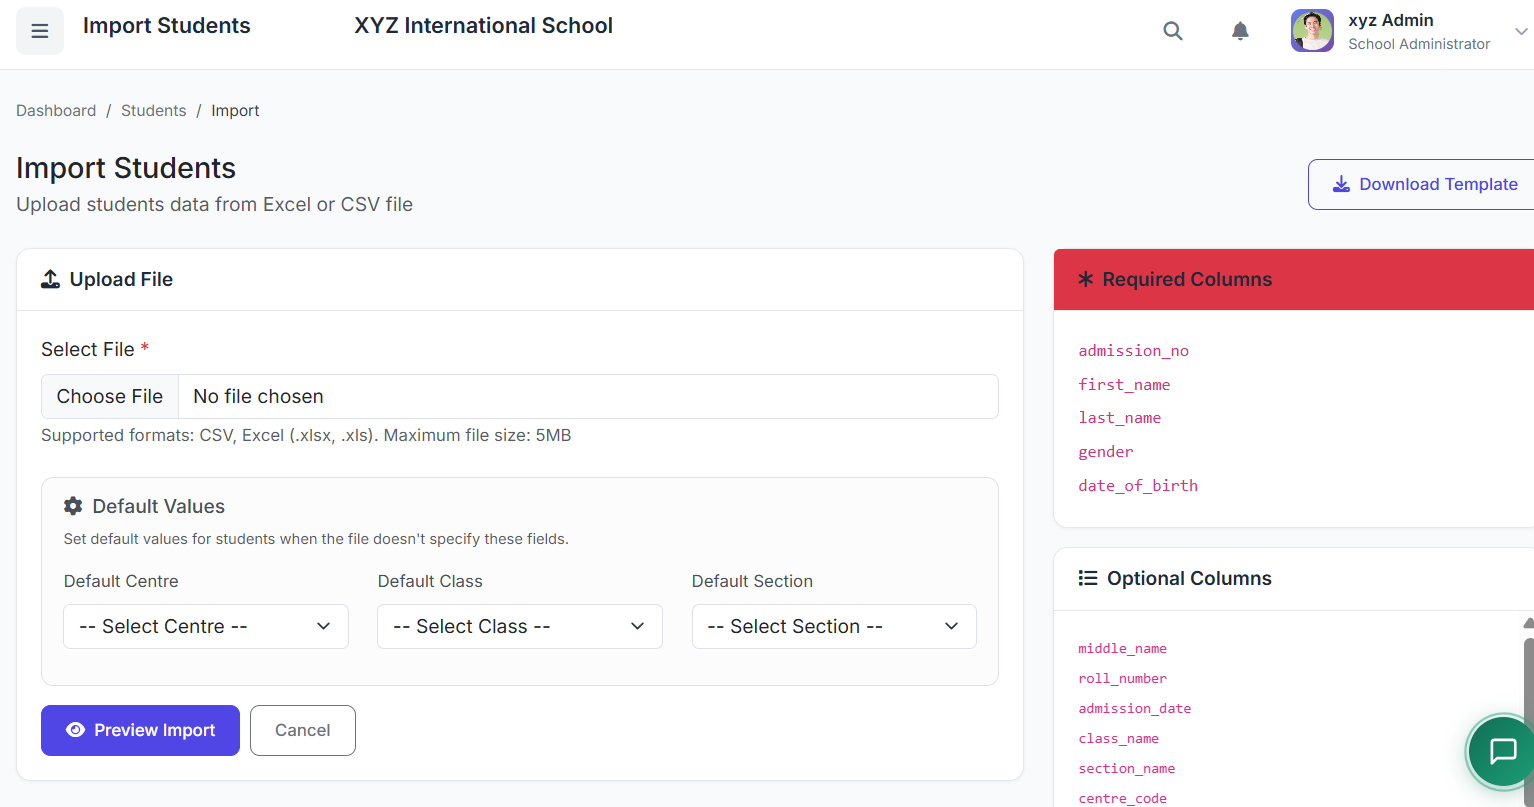
Click Import Students
Download template — mirrors your original student record with SSMS format
Fill student data in Excel
Required fields: admission_no, first_name, last_name, gender, date_of_birth
Upload template — takes you to review page
Review → Confirm import
Click Import Students
Download template — mirrors your original student record with SSMS format
Fill student data in Excel
Required fields:
admission_no,first_name,last_name,gender,date_of_birth
Upload template — takes you to review page
Review → Confirm import
📎 Exporting Student Data
Apply filters
Click Export
Select format (Excel, CSV, PDF)
Download
Apply filters
Click Export
Select format (Excel, CSV, PDF)
Download
🖨️ Printing Student Data
Apply filters
Click Print button
Send to printer
Apply filters
Click Print button
Send to printer
🗑️ Deleting a Student
⚠️ Warning: Deletion removes all records. Prefer status change instead.
Click Delete
Confirm deletion
⚠️ Warning: Deletion removes all records. Prefer status change instead.
Click Delete
Confirm deletion
✅ Best Practices
Use consistent admission numbers (e.g., ADM2025001)
Upload clear, recent photos
Keep contact info updated
Link students to parents/guardians
Prefer status changes over deletion
Use consistent admission numbers (e.g., ADM2025001)
Upload clear, recent photos
Keep contact info updated
Link students to parents/guardians
Prefer status changes over deletion
🏁 Closing
That's the Students module in SSMS — the central hub for managing all student information efficiently.