Introduction
Here, I'll walk you through the User Management module in SSMS.
This module allows administrators to control who can access the system, what they can see, and what actions they are allowed to perform.
Important: This task can only be performed by the School Admin.
📍 Accessing User Management
To access User Management:
Go to User Management in the sidebar
Then select User Manager
This opens the users management page where all system accounts are listed.
👥 Users vs. Staff Explained
Before we proceed, it's important to understand the difference between Users and Staff.
| Type | Description |
|---|---|
| Users | System login accounts used to access SSMS |
| Staff | Employment information (personal details, qualifications, salary) |
Each staff member may have one user account, but not all staff records necessarily require login access.
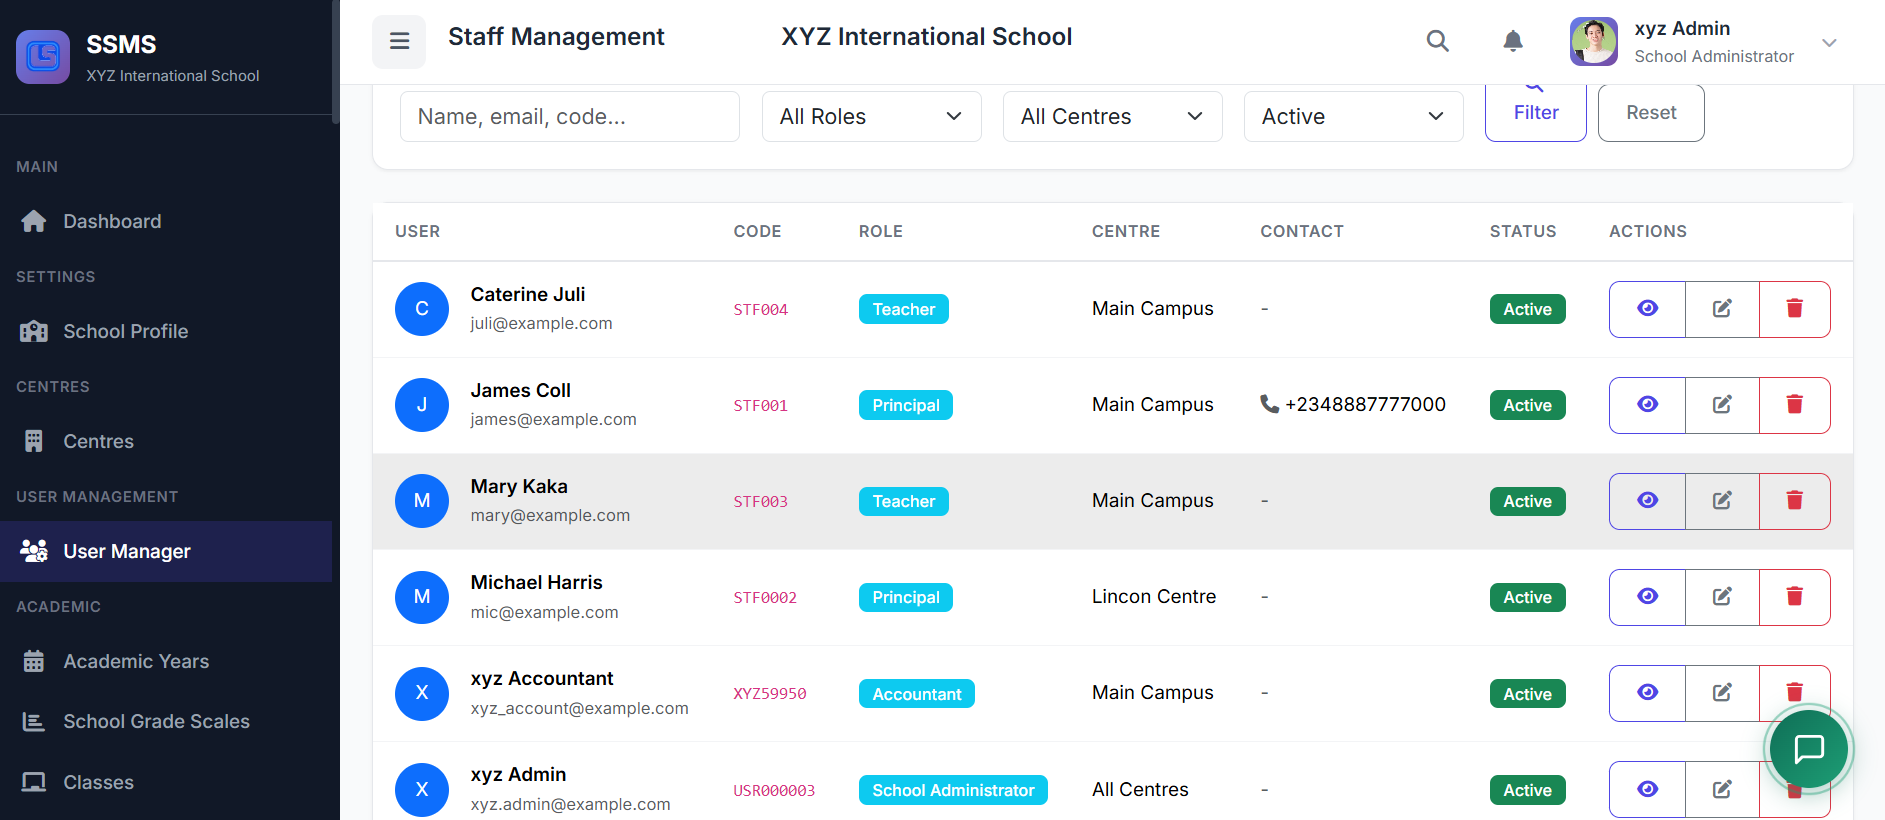
📋 Users List Page
On the Users page, you'll see a table displaying all system accounts.
Each row shows:
User Code – Automatically generated by the system
Name & Email – User's full name and email address
Role & Centre – Assigned role and centre (where applicable)
Account Status – Active, Inactive, or Suspended
Last Login – Date and time of last access
Actions – Edit, Reset Password, or Delete buttons
➕ Adding a New User
To create a new system user, click the Add User button.

In the form, provide the following:
| Field | Description |
|---|---|
| Full Name | User's complete name |
| Unique address used for login | |
| Initial Password | Set and confirm a temporary password |
| Phone Number | Optional contact info |
| Role | Select appropriate role |
| Centre | Assign to a centre (if required by role) |
| Account Status | Active or Inactive |
Once completed, click Create User to save.
🧑💼 User Roles Overview
SSMS uses role-based access control to ensure users only see what they need.
| Role | Access Level |
|---|---|
| School Admin | Full access – manages all centres within the school |
| Principal | Limited to their assigned centre |
| Vice Principal | Assists the principal in daily operations |
| Teacher | Manages classes, attendance, grades, and timetables |
| Librarian | Handles book collections, borrowing, returns, and fines |
| Accountant | Handles school finances, fee collection, invoicing, and reports |
Each role is carefully designed to maintain security and efficiency.
✏️ Editing a User
To edit an existing user:
Locate the user in the list
Click the Edit icon
You can update the user's details, role, centre assignment, or status.
After making changes, click Update User to save.
🔑 Resetting a User Password
If a user forgets their password:
Click the Reset Password icon next to the user
Enter and confirm a new password
Click Reset to apply
Security tip: Be sure to communicate the new password to the user securely.
🔄 Changing User Status
Each user account can have one of three statuses:
| Status | Description |
|---|---|
| Active | Full system access allowed |
| Inactive | Login prevented, but account preserved |
| Suspended | Temporary restrictions applied |
To change a user's status, simply edit the user and update the status field.
🗑️ Deleting a User
Deleting a user permanently removes their login access.
To delete:
Click the Delete icon
Confirm the action
Note: While the user can no longer log in, their historical records remain preserved for reporting and auditing purposes.
✅ Best Practices
For effective user management:
Use official, professional email addresses
Assign only the minimum required role for each user
Regularly review and deactivate unused accounts
Encourage strong passwords and periodic password changes
Keep user accounts aligned with staff records
🏁 Closing
That's how User Management works in SSMS.