💰 Module Overview
In this tutorial, we'll learn how to view, track, and manage all fees assigned to students—including payments, balances, discounts, and overall financial status.
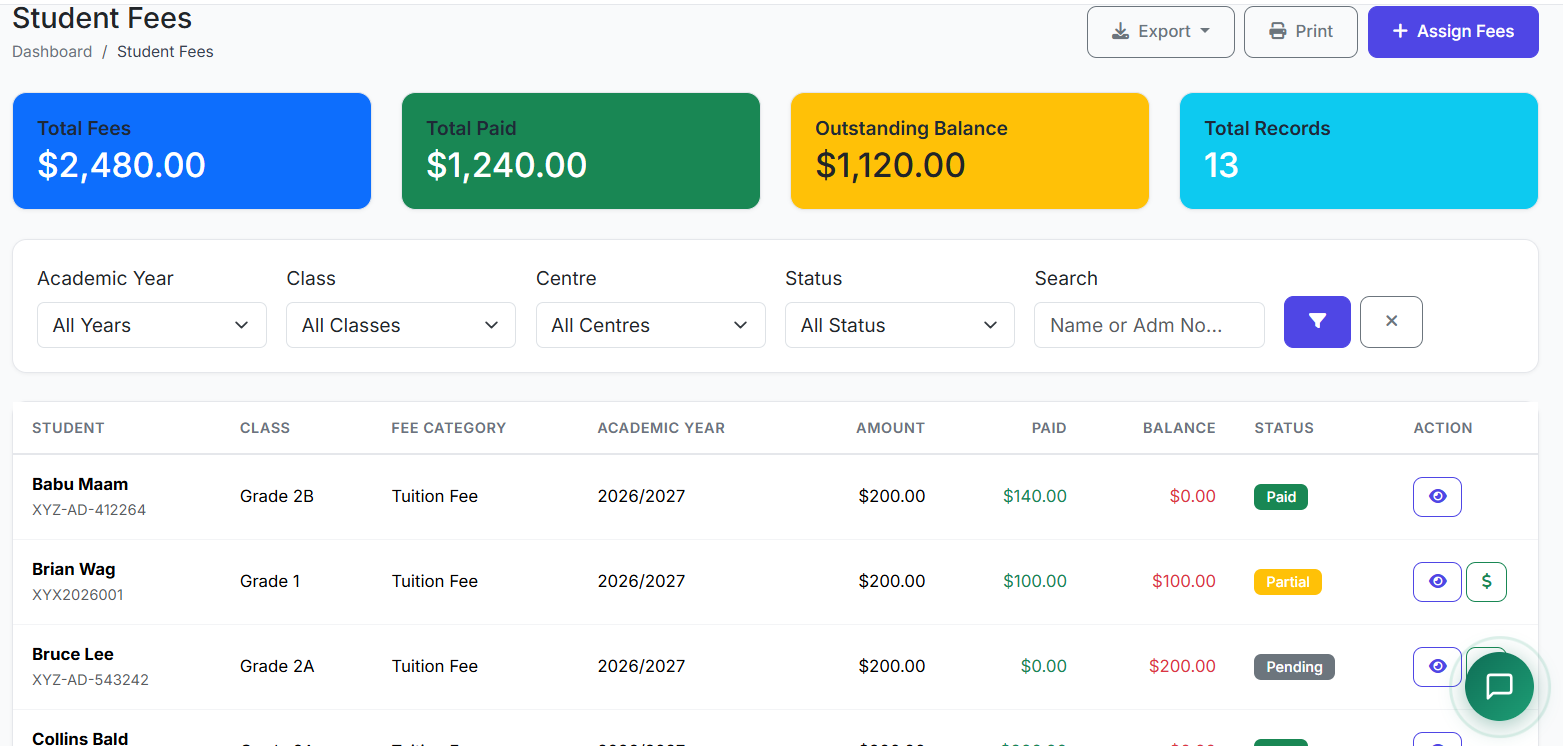
The Student Fees module provides a consolidated view of every student's financial account. It is the central dashboard for monitoring fee assignments, tracking payments, identifying outstanding balances, and managing the school's revenue collection.
🧭 How to Access
Navigate to: Finance → Student Fees
📋 Student Fees List Overview
The main page displays a comprehensive list of all student fee records. Key columns include:
| Column | Description |
|---|---|
| Student Name/ID | Student identification. |
| Class/Section | Current academic placement. |
| Fee Category | Type of fee (e.g., Tuition). |
| Total Amount | Original fee before discounts/fines. |
| Discount | Any reduction applied. |
| Net Amount | Payable amount after discounts. |
| Paid Amount | Sum received to date. |
| Balance | Outstanding amount. |
| Status | Payment state (e.g., Unpaid, Paid). |

🔍 Understanding Fee Statuses
| Status | Meaning |
|---|---|
| Unpaid | No payment has been received. |
| Partial | Some payment made, but a balance remains. |
| Paid | The fee has been fully settled. |
| Overdue | The due date has passed with an unpaid balance. |
| Waived | The fee has been officially forgiven or cancelled. |
🎯 Filtering for Efficient Management
Use the powerful filters at the top to quickly find specific records:
Class / Section: View fees for a particular class or section.
Fee Category: Filter by type (e.g., see all Tuition fees).
Payment Status: Isolate Unpaid, Overdue, or Partial payments for follow-up.
Date Range: Filter by due date or assignment period.
Centre: For multi-branch schools.
👁️ Viewing Fee Details & History
Click on any fee record to open the Student Fee Details view. This page provides:
Full breakdown: Original amount, applied discount, any late fines.
Complete Payment History: A ledger of all payments received (date, amount, method).
Actions: Options to Record Payment, Print Receipt, or Edit the fee record (if permitted).

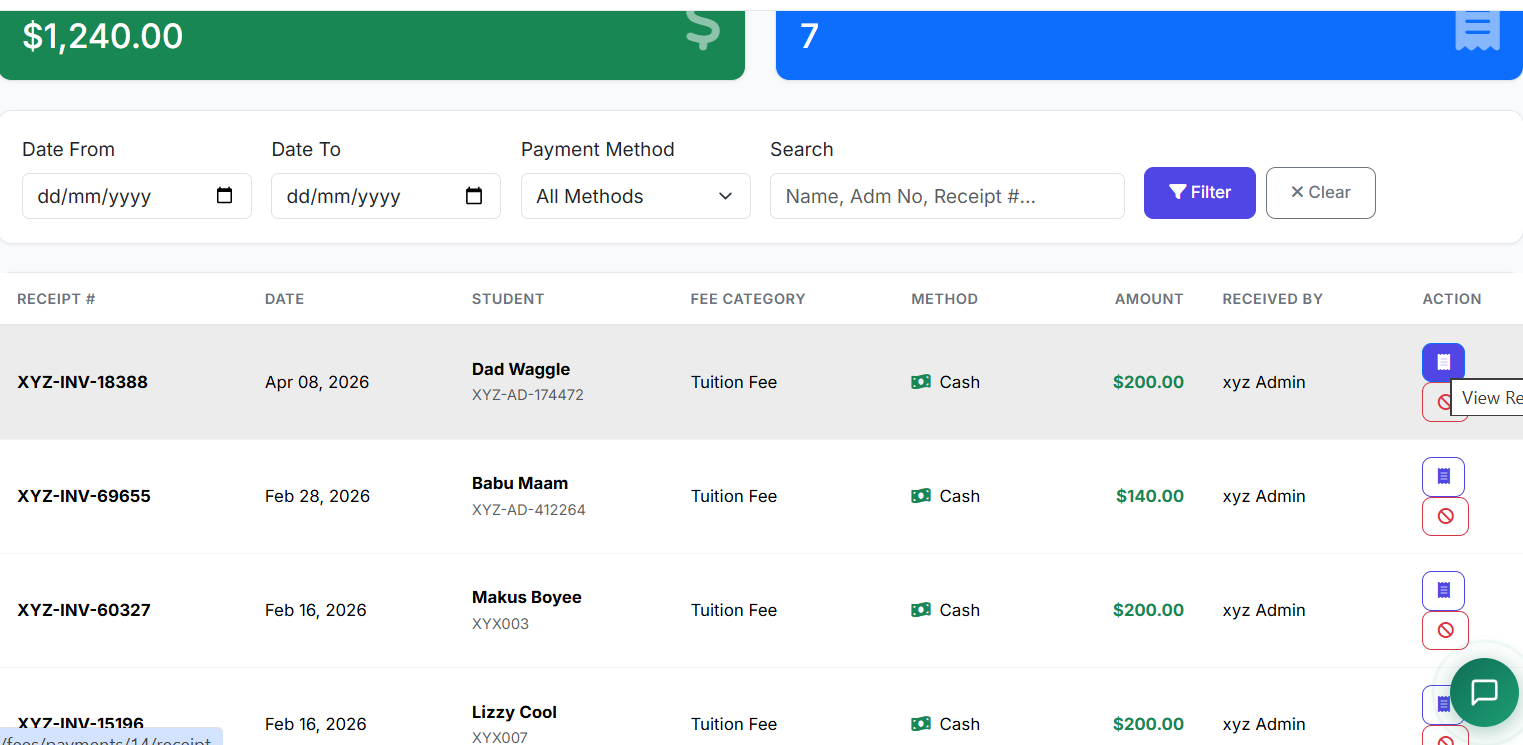
🧾 Generating Fee Receipts
From the Fee Details page, locate a specific payment in the history.
Click Generate Receipt or Print Receipt.
The system produces an official receipt that can be:
Printed for physical copies.
Emailed directly to parents.
Downloaded as a PDF.


⚙️ Common Actions
From the main list or details page, you can typically:
View Details: See the complete fee breakdown.
Record Payment: Log a new payment (cash, bank transfer, cheque, etc.).
Edit Record: Adjust details (e.g., apply a late fine, add a discount) if permissions allow.
Send Reminder: Initiate a payment reminder notification to parents.
✅ Best Practices
Regular Reviews: Daily or weekly, review the Unpaid and Overdue filters to identify accounts needing follow-up.
Prompt Follow-up: Contact parents promptly when fees become overdue to maintain cash flow.
Accurate Recording: Ensure every payment is recorded immediately and matched to the correct student fee.
Report Generation: Weekly/Monthly, generate summary reports (Total Collected, Total Outstanding) for school management.
Maintain Transparency: Use the system to provide parents with clear, up-to-date statements and receipts.
The Student Fees module is the operational heart of the school's financial system, providing full visibility, control, and efficiency in fee tracking and collection.
Next, we will explore the Payment Collection and Accounting Reports features.